How to Created Default Vpc Again on Aws
AWS non-default VPC
Introduction
In this guide we will learn more about creating a custom AWS network for our VMs. The main objective of this guide is to show how you can customize your stack template further to define your own network structure and add instances to your network. We will create a high availability service by creating a two tier structure having a single web server and two database instances. Each server will be in different physical location.
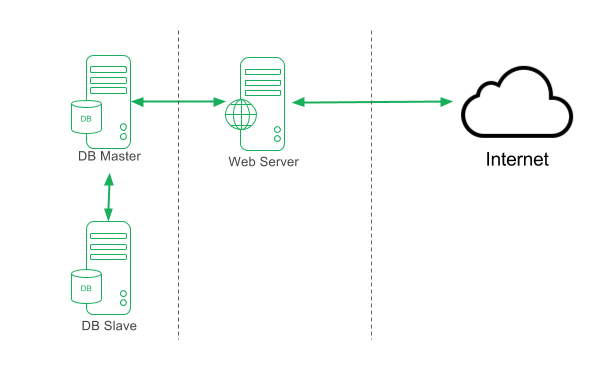 Table of contents
- Before we start..
- Full stack
- Steps
- Creating a stack
- Edit your stack name
- Provider
- Create a VPC
- Create Subnets
- Create Internet Gateway
- Create Route Table
- Associate route table with our subnets
- Create Security Group
- Generate & assign Elastic IPs
- Create Instances
- Full steps animation
- Build & Test our stack
- Further notes
- Troubleshooting
Before we start..
It is a good idea to familiarize yourself with AWS VPC (Virtual Private Cloud) if you are not familiar with it already, please spend sometime to understand its concepts. This will help you greatly to go through this guide of how we create our stack template for our AWS non-default VPC.
We will create a VPC (Virtual Private Cloud) with subnets created in different availability zones (different physical locations) to ensure higher availability. Learn more about AWS availability zones
In this guide we will learn how to create:
- AWS VPC (Virtual Private Cloud)
- Subnets
- Internet Gateway
- Routing Tables
- Security Groups
- Attach Elastic IPs to our VMs
- Create a VM within a subnet
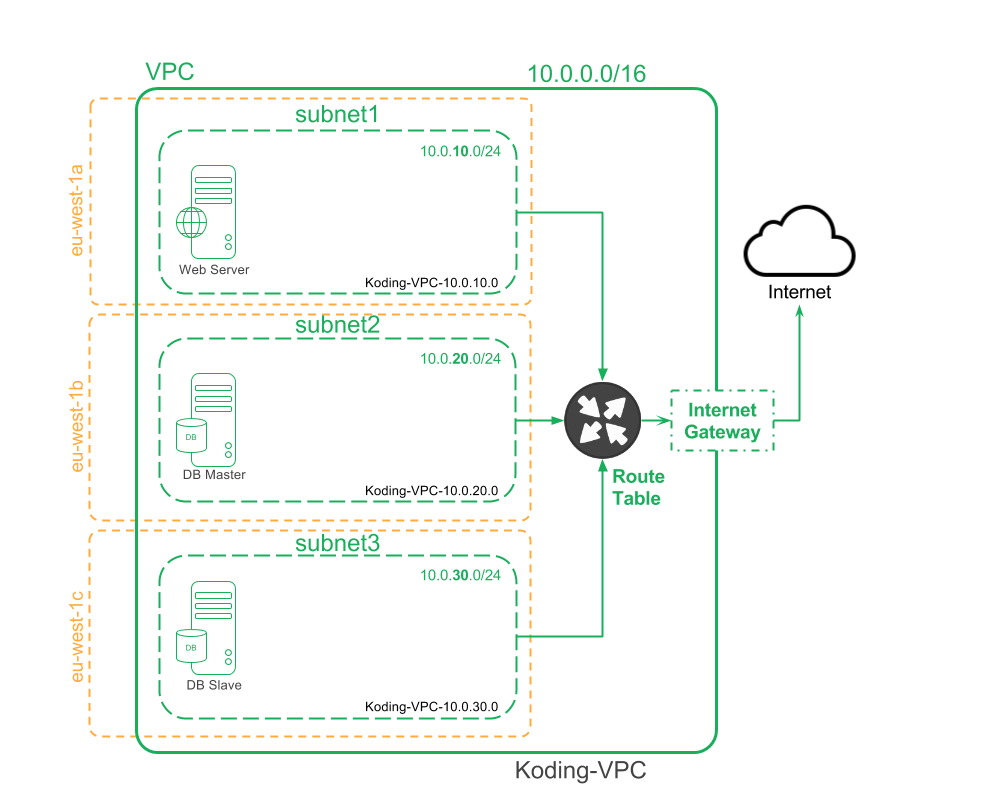
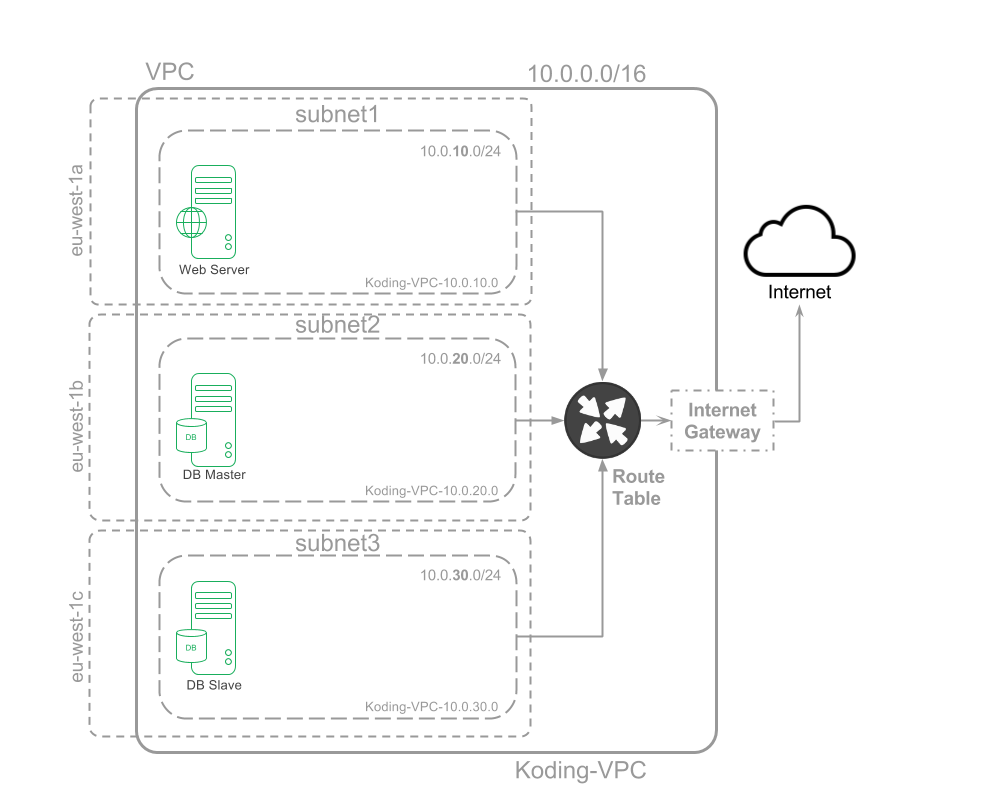
Our intended structure is to have an AWS non-default VPC (Virtual Private Cloud) with three subnets and three VMs with access to internet:
Full Stack
This is the full listing of our stack template. Continue reading below to go through the explanation of each section.
# This stack will create a two-tier VPC with Elastic IP provider : aws : access_key : ' ${var.aws_access_key}' secret_key : ' ${var.aws_secret_key}' resource : aws_vpc : main : cidr_block : 10.0.0.0/16 instance_tenancy : " default" tags : Name : ' Koding-VPC' aws_subnet : subnet1 : vpc_id : ' ${aws_vpc.main.id}' availability_zone : ' eu-west-1a' cidr_block : 10.0.10.0/24 tags : Name : ' Koding-VPC-10.0.10.0' subnet2 : vpc_id : ' ${aws_vpc.main.id}' availability_zone : ' eu-west-1b' cidr_block : 10.0.20.0/24 tags : Name : ' Koding-VPC-10.0.20.0' subnet3 : vpc_id : ' ${aws_vpc.main.id}' availability_zone : ' eu-west-1c' cidr_block : 10.0.30.0/24 tags : Name : ' Koding-VPC-10.0.30.0' aws_internet_gateway : internet_gw : vpc_id : ' ${aws_vpc.main.id}' tags : Name : ' Koding-VPC-internet-gateway' aws_route_table : internet_rtable : vpc_id : ' ${aws_vpc.main.id}' route : cidr_block : 0.0.0.0/0 gateway_id : ' ${aws_internet_gateway.internet_gw.id}' tags : Name : ' Koding-VPC-route-table' aws_route_table_association : subnet1_associate : subnet_id : ' ${aws_subnet.subnet1.id}' route_table_id : ' ${aws_route_table.internet_rtable.id}' subnet2_associate : subnet_id : ' ${aws_subnet.subnet2.id}' route_table_id : ' ${aws_route_table.internet_rtable.id}' subnet3_associate : subnet_id : ' ${aws_subnet.subnet3.id}' route_table_id : ' ${aws_route_table.internet_rtable.id}' aws_security_group : security_group : name : ' Koding-VPC-sg' description : ' Koding VPC allowed traffic' vpc_id : ' ${aws_vpc.main.id}' tags : Name : ' Koding-allowed-traffic' ingress : - from_port : 22 to_port : 22 protocol : tcp cidr_blocks : - 0.0.0.0/0 - from_port : 80 to_port : 80 protocol : tcp cidr_blocks : - 0.0.0.0/0 - from_port : 56789 to_port : 56789 protocol : tcp cidr_blocks : - 0.0.0.0/0 egress : - from_port : 0 to_port : 65535 protocol : tcp cidr_blocks : - 0.0.0.0/0 aws_eip : team-web-server_eip : instance : ' ${aws_instance.team-web-server.id}' vpc : true db_master_eip : instance : ' ${aws_instance.db-master.id}' vpc : true db_slave_eip : instance : ' ${aws_instance.db-slave.id}' vpc : true aws_instance : team-web-server : instance_type : t2.micro subnet_id : ' ${aws_subnet.subnet1.id}' depends_on : [ ' aws_internet_gateway.internet_gw' ] vpc_security_group_ids : - ' ${aws_security_group.security_group.id}' ami : ' ' tags : Name : ' alpha-webserver-${var.koding_user_username}-${var.koding_group_slug}' db-master : instance_type : t2.micro subnet_id : ' ${aws_subnet.subnet2.id}' depends_on : [ ' aws_internet_gateway.internet_gw' ] vpc_security_group_ids : - ' ${aws_security_group.security_group.id}' ami : ' ' tags : Name : ' DB-master-${var.koding_user_username}-${var.koding_group_slug}' db-slave : instance_type : t2.micro subnet_id : ' ${aws_subnet.subnet3.id}' depends_on : [ ' aws_internet_gateway.internet_gw' ] vpc_security_group_ids : - ' ${aws_security_group.security_group.id}' ami : ' ' tags : Name : ' DB-slave-${var.koding_user_username}-${var.koding_group_slug}' Steps
Along the next sections, we will write our stack template section by section showing what each section accomplishes in our network
Creating a stack
- ClickStacks
- Click New Stack
- Choose Amazon -> Click Next
- Set your AWS credentials in the Credentials tab
For detailed steps on how to create an AWS stack you can refer to Create AWS Stack guide
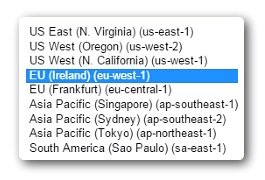
We created our AWS keys in region EU Ireland (eu-west-1), which means our Availability Zones will be relevant to this region. Learn more about AWS availability zones
Edit your stack name
A stack name is auto generated when you create a new stack, however if you plan on having multiple stacks, it is a good practice to name your Stack to something you can remember in a glance.

Provider
The first section defines the service provider, usually you wouldn't need to change this part
# This stack will create a two-tier VPC with Elastic IP provider : aws : access_key : ' ${var.aws_access_key}' secret_key : ' ${var.aws_secret_key}' Create a VPC
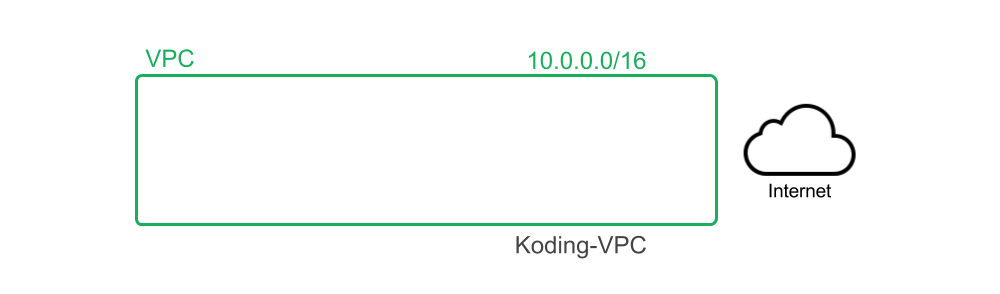
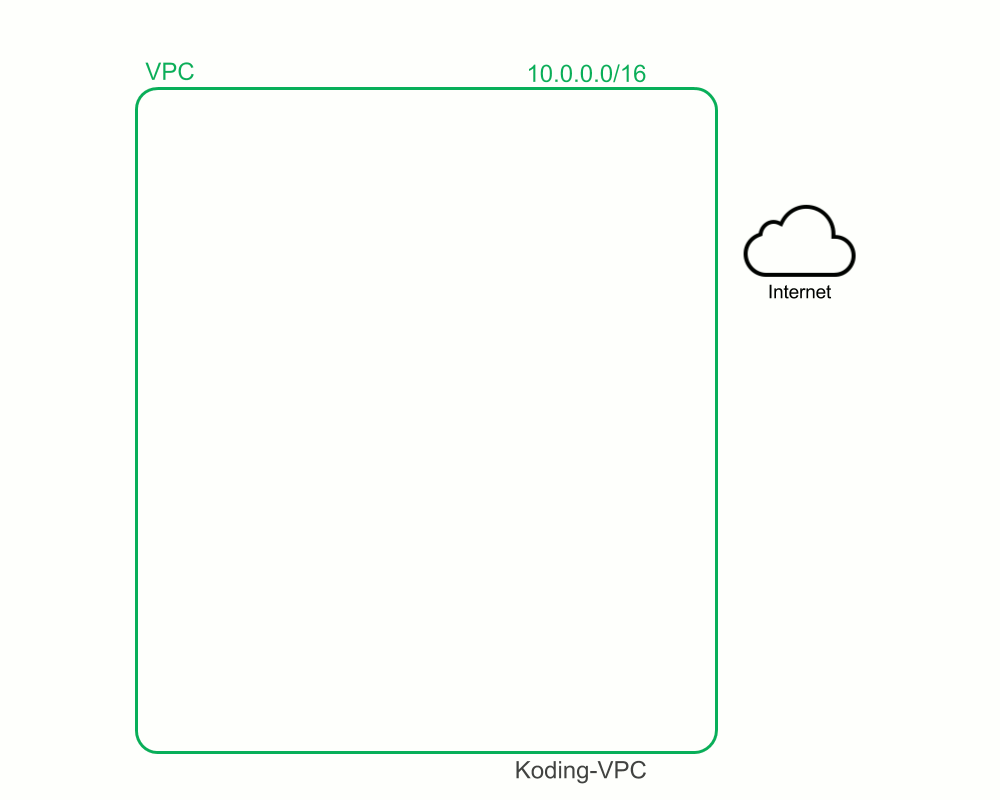
Create the VPC network that will contain all our VMs
resource : aws_vpc : main : cidr_block : 10.0.0.0/16 instance_tenancy : " default" tags : Name : ' Koding-VPC' Explanation:
-
resource:resources section contains ALL our created resources (network, instances, configurations…etc.). This is the root header of all our upcoming configurations in all the stack template-
aws_vpc:we create an AWS VPC with the following parameters-
main:we name this section 'main' since we only have a single VPC (can be any name you wish)-
cidr_block: 10.0.0.0/16this defines a VPC network with 65536 private IP addresses -
instance_tenancy: "default"we will run our instances on shared hardware. Other option is 'dedicated', learn more about dedicated instances -
tags:header for key:value attributes for our main VPC-
name: 'Koding-VPC'we define a key-value pair to identify our VPC with a tag. We 'named' our VPC 'Koding-VPC'
-
-
-
-
Network status:
Create subnets
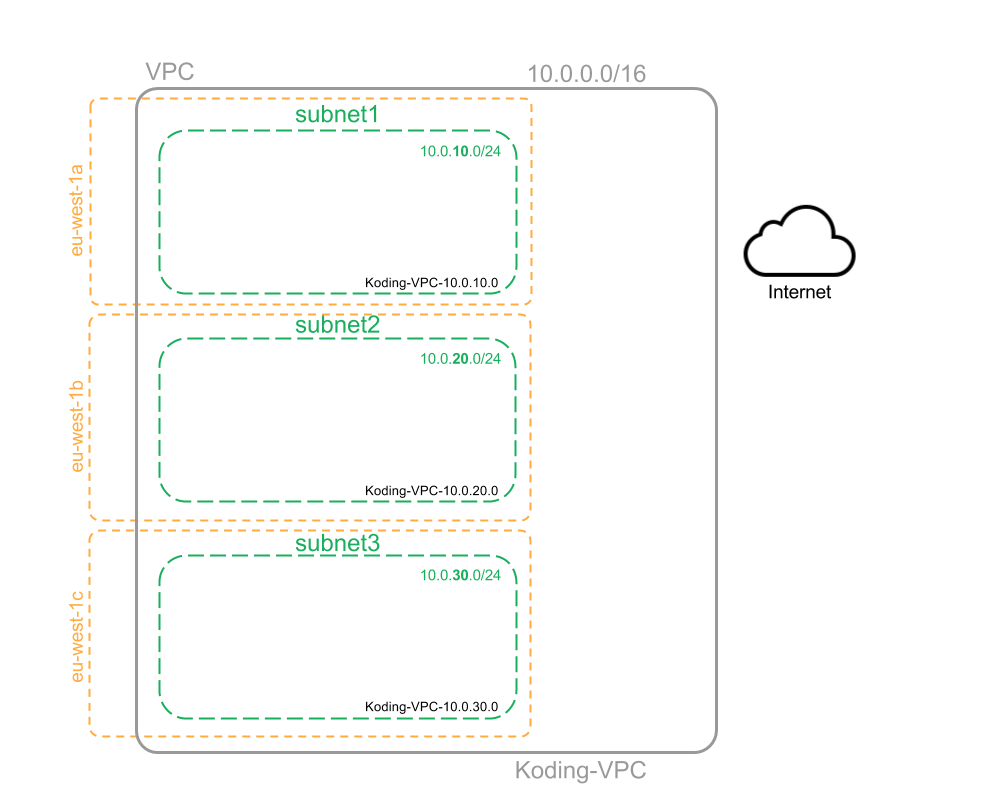
aws_subnet : subnet1 : vpc_id : ' ${aws_vpc.main.id}' availability_zone : ' eu-west-1a' cidr_block : 10.0.10.0/24 tags : Name : ' Koding-VPC-10.0.10.0' subnet2 : vpc_id : ' ${aws_vpc.main.id}' availability_zone : ' eu-west-1b' cidr_block : 10.0.20.0/24 tags : Name : ' Koding-VPC-10.0.20.0' subnet3 : vpc_id : ' ${aws_vpc.main.id}' availability_zone : ' eu-west-1c' cidr_block : 10.0.30.0/24 tags : Name : ' Koding-VPC-10.0.30.0' Explanation:
-
aws_subnet:we create our subnets below "aws_subnet" header-
subnet1:we name our first subnet "subnet1" can be any name you wish-
vpc_id: '${aws_vpc.main.id}'we bind this subnet to be created within our VPC which we created in the "aws_vpc" section above. We bind it using the VPC id, which can be fetched following the hierarchy it was created in i.e.: aws_vpc (section head) --> main (our vpc section name) --> id _(this is a VPC attribute)_Therefore we use ${aws_vpc.main.id} -
availability_zone: 'eu-west-1a'we here define which availability zone our subnet will be created in, for oursubnet1 we chose "eu-west-1a" -
cidr_block: 10.0.10.0/24we define our subnet IP range to have the IPs 10.0.10.0/24. This allows our subnet to have up to 254 private IP addresses and our VMs in this subnet to start with 10.0.10.XXX -
tags:header for key:value attributes for our subnet subnet1-
name: 'Koding-VPC-10.0.10.0'we define a key-value pair to identify our subnet1 with a tag. We 'named' our subnet1 'Koding-VPC-10.0.10.0' (can be any name you wish)
-
-
-
The same goes for our subsequent lines to define the other two subnets "subnet2" & "subnet3". Note that we defined our subnets with:
- Different IPs
- Different tags (names)
- Different availability zones (for high availability of our services)
-
| Subnet | IP | name tag | Availability Zone |
|---|---|---|---|
| subnet1 | 10.0.10.0 | Koding-VPC-10.0.10.0 | eu-west-1a |
| subnet2 | 10.0.20.0 | Koding-VPC-10.0.20.0 | eu-west-1b |
| subnet3 | 10.0.30.0 | Koding-VPC-10.0.30.0 | eu-west-1c |
Learn more about AWS availability zones
Network status:
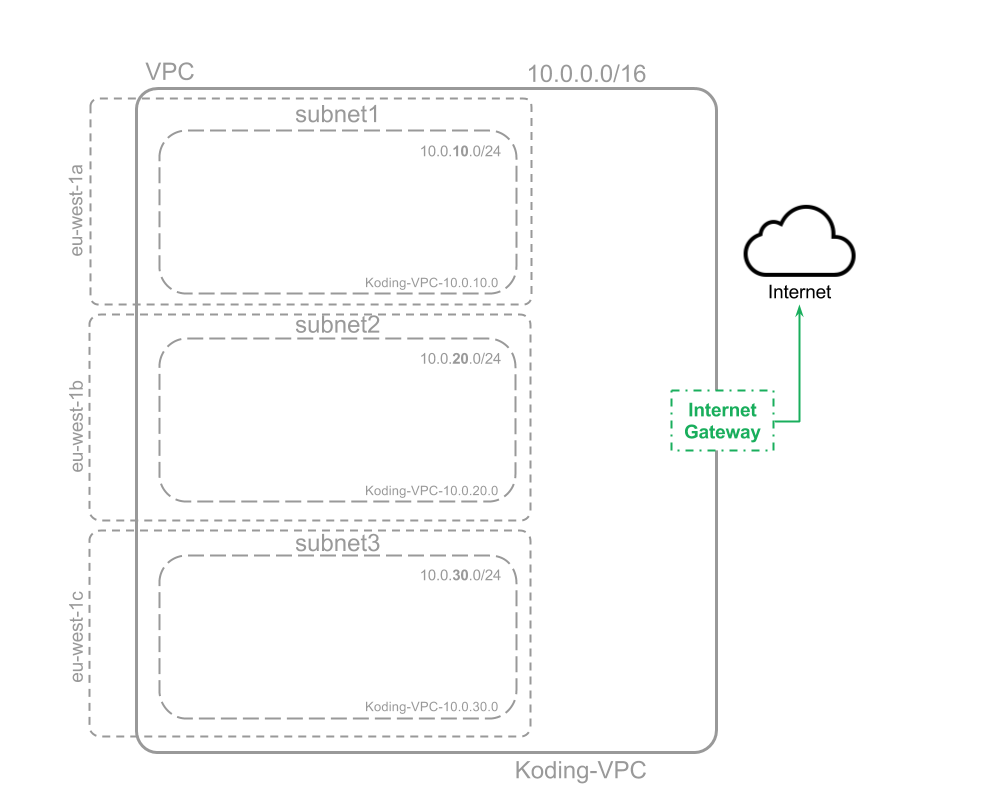
Create Internet Gateway
aws_internet_gateway : internet_gw : vpc_id : ' ${aws_vpc.main.id}' tags : Name : ' Koding-VPC-internet-gateway' Explanation:
-
aws_internet_gateway:we create our internet gateway below "aws_internet_gateway" header-
internet_gw:we name our internet gateway "internet_gw" can be any name you wish-
vpc_id: '${aws_vpc.main.id}'we attach the internet gateway to our VPC created in the "aws_vpc" section above. We attach it using the VPC id, which can be fetched by following the hierarchy it was created in i.e.:aws_vpc (section head) --> main (our vpc section name) --> id (this is a VPC attribute) Therefore we use${aws_vpc.main.id} -
tags:header for key:value attributes for our internet gateway internet_gw-
name: 'Koding-VPC-internet-gateway'we define a key-value pair to identify our internet_gw with a tag. We 'named' our internet_gw 'Koding-VPC-internet-gateway' (can be any name you wish)
-
-
-
Network status:
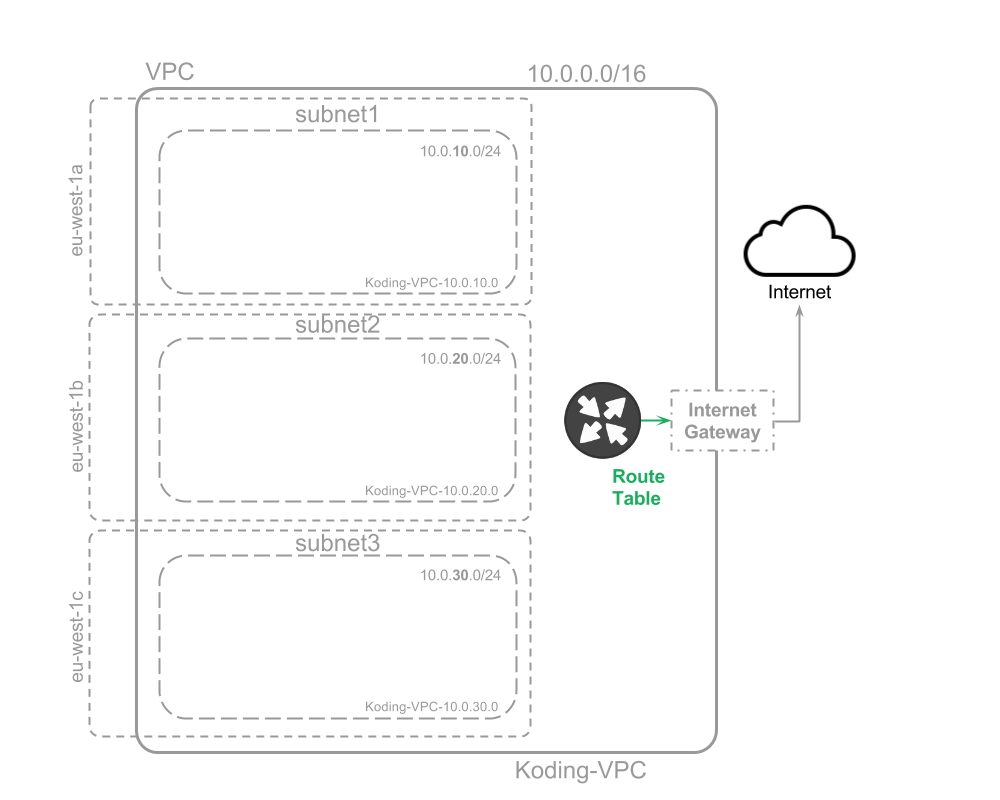
Create Route Table
aws_route_table : internet_rtable : vpc_id : ' ${aws_vpc.main.id}' route : cidr_block : 0.0.0.0/0 gateway_id : ' ${aws_internet_gateway.internet_gw.id}' tags : Name : ' Koding-VPC-route-table' Explanation:
-
aws_route_table:we create our Route Table below "aws_route_table" header-
internet_rtable:we name our Route Table "internet_rtable" can be any name you wish-
vpc_id: '${aws_vpc.main.id}'we attach the Route Table to our VPC created in the "aws_vpc" section above. We attach it using the VPC id, which can be fetched by following the heirarchy it was created in i.e.: aws_vpc(section head) –> main (our vpc section name) –> id (this is a VPC attribute) Therefore we use${aws_vpc.main.id} -
route:the header to define a list of route objects-
cidr_block: 0.0.0.0/0required the CIDR block of the route. -
gateway_id: '${aws_internet_gateway.internet_gw.id}'the Internet Gateway ID.
-
-
tags:header for key:value attributes for our internet gateway internet_gw-
name: 'Koding-VPC-route-table'we define a key-value pair to identify our internet_rtable with a tag. We 'named' our internet_rtable 'Koding-VPC-route-table' (can be any name you wish)
-
-
-
Network status:
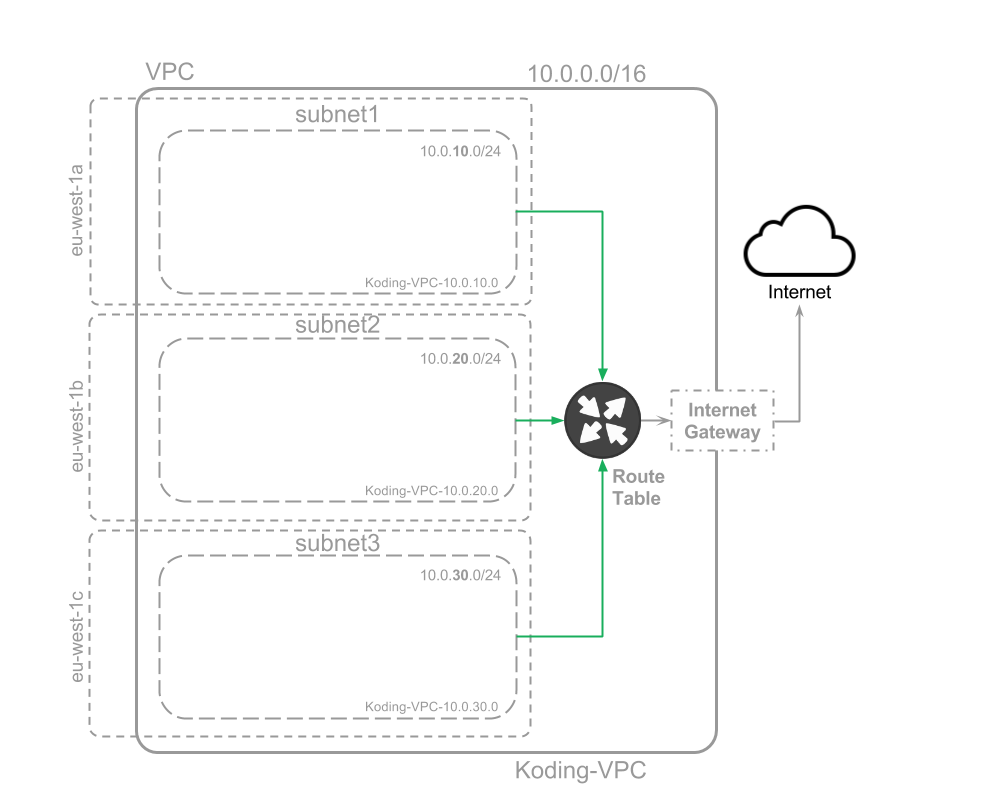
Associate route table with our subnets
aws_route_table_association : subnet1_associate : subnet_id : ' ${aws_subnet.subnet1.id}' route_table_id : ' ${aws_route_table.internet_rtable.id}' subnet2_associate : subnet_id : ' ${aws_subnet.subnet2.id}' route_table_id : ' ${aws_route_table.internet_rtable.id}' subnet3_associate : subnet_id : ' ${aws_subnet.subnet3.id}' route_table_id : ' ${aws_route_table.internet_rtable.id}' Explanation:
aws_route_table_association: we create our route table Associations below_ "aws_route_table_association" header
-
subnet1_associate:we name our first association section "subnet1_associate", can be any name you wish-
subnet_id: '${aws_subnet.subnet1.id}'we add our subnet (by its ID) to this association. The ID attribute of our first subnet "subnet1" fetched by following the hierarchy it was created in i.e.: aws_subnet (section head of our subnet) –> subnet1 (our subnet section name) --> id (this is a subnet attribute) Therefore we use'${aws_subnet.subnet1.id}' -
route_table_id: '${aws_route_table.internet_rtable.id}'we then add our route table ID to complete our association. The ID attribute of our route table "internet_rtable" fetched by following the heirarchy it was created in i.e.: aws_route_table (section head of our route table) –> internet_rtable (our route table section name) –>id (this is a route table attribute) Therefore we use '${aws_route_table.internet_rtable.id}'
-
-
The same goes for our subsequent lines to define the other two subnets associations to our route table internet_rtable.
- ** Remember: type in the correct subnet section_id names (in our example "${aws_subnet.subnet1.id}" & "${aws_subnet.subnet3.id}") and have a different name for each association rule (in our example "subnet2_associate" & "subnet3_associate") as you can see in our stack file
Network status:
Create Security Group
We will create a single security group to define our allowed IP & ports ranges for our VMs
aws_security_group : security_group : name : ' Koding-VPC-sg' description : ' Koding VPC allowed traffic' vpc_id : ' ${aws_vpc.main.id}' tags : Name : ' Koding-allowed-traffic' ingress : - from_port : 22 to_port : 22 protocol : tcp cidr_blocks : - 0.0.0.0/0 - from_port : 80 to_port : 80 protocol : tcp cidr_blocks : - 0.0.0.0/0 - from_port : 56789 to_port : 56789 protocol : tcp cidr_blocks : - 0.0.0.0/0 egress : - from_port : 0 to_port : 65535 protocol : tcp cidr_blocks : - 0.0.0.0/0 Explanation:
-
aws_security_group:we create our security group below "aws_security_group" header-
security_group:we name our only security group section "security_group", can be any name you wish-
name: 'Koding-VPC-sg'optional, we name our security group "Koding-VPC-sg", can be any name you wish -
description: 'Koding VPC allowed traffic'optional, we add a description to our security group -
vpc_id: '${aws_vpc.main.id}'optional, the VPC id -
tags:header for key:value attributes for our security group security_group-
name: 'Koding-allowed-traffic'we define a key-value pair to identify our security_group with a tag. We 'named' our security_group 'Koding-allowed-traffic' (can be any name you wish)
-
-
ingress:section for defining all incoming connections IPs & ports to our VMs
```
- from_port: 22 to_port: 22 protocol: tcp cidr_blocks: - 0.0.0.0/0This section contains: - The port ranges (from-to) allowed to access our VMs - required - The allowed protocol type
tcp- required - List of CIDR blocks - optionalFor every port/IP range, we need to repeat this section. In our example we allowed ports HTTP (80), SSH (22) & a required custom port (56789).
-
Note: when defining custom ports make sure you allow port 56789, it is required to be open in order for your stack to be built, otherwise Koding for Teams will not be able to access your machines when building your stack and eventually your stack will fail to build.
-
Ingress ports:
Type Protocol Port Range Source SSH TCP 22 0.0.0.0/0 HTTP TCP 80 0.0.0.0/0 Custom TCP 56789 0.0.0.0/0 -
egress:section for defining all outgoing connections IPs & ports from our VMs
```yaml
egress: - from_port: 0 to_port: 65535 protocol: tcp cidr_blocks: - 0.0.0.0/0We allowed all TCP connections on all ports & IPs from our VMs
-
Egress ports:
Type Protocol Port Range Destination All TCP All 0.0.0.0/0
-
-
Generate & assign Elastic IPs
Creating a non-default AWS VPC will not assign public IPs to our VMs, only private IPs. We generate Elastic IPs here and connect them with our instances which we will create in the next section of our Stack Template file.
aws_eip : team-web-server_eip : instance : ' ${aws_instance.team-web-server.id}' vpc : true db_master_eip : instance : ' ${aws_instance.db-master.id}' vpc : true db_slave_eip : instance : ' ${aws_instance.db-slave.id}' vpc : true Explanation:
-
aws_eip:we generate Elastic IPs & assign to VMs below the "aws_eip" header-
team-web-server_eip:we name our first eip section "team-web-server_eip", can be any name you wish-
instance: '${aws_instance.team-web-server.id}'we assign the Elastic IP to an instance called "team-web-server" as defined in the next section of our stack template -
vpc: truea Boolean indicating if the EIP is in a VPC or not - optional
-
-
Create Instances
This is our last section of our VPC Stack template, we now have everything related to the network set and only waiting for our VMs to be created. As mentioned before we will create a single instance in each subnet.
aws_instance : team-web-server : instance_type : t2.micro subnet_id : ' ${aws_subnet.subnet1.id}' depends_on : [ ' aws_internet_gateway.internet_gw' ] vpc_security_group_ids : - ' ${aws_security_group.security_group.id}' ami : ' ' tags : Name : ' alpha-webserver-${var.koding_user_username}-${var.koding_group_slug}' db-master : instance_type : t2.micro subnet_id : ' ${aws_subnet.subnet2.id}' depends_on : [ ' aws_internet_gateway.internet_gw' ] vpc_security_group_ids : - ' ${aws_security_group.security_group.id}' ami : ' ' tags : Name : ' DB-master-${var.koding_user_username}-${var.koding_group_slug}' db-slave : instance_type : t2.micro subnet_id : ' ${aws_subnet.subnet3.id}' depends_on : [ ' aws_internet_gateway.internet_gw' ] vpc_security_group_ids : - ' ${aws_security_group.security_group.id}' ami : ' ' tags : Name : ' DB-slave-${var.koding_user_username}-${var.koding_group_slug}' Explanation:
-
aws_instance:we create our VMs below the "aws_instance" header-
team-web-server:we name our first VM section "team-web-server", can be any name you wish-
instance_type: t2.microwe define the machine type for our VM -
subnet_id: '${aws_subnet.subnet1.id}'we choose to create this VM in subnet1 by its ID. Note that "subnet1" in ${aws_subnet.subnet1.id} is the section name as we defined it in the aws_subnet section. Replace subnet1 with the name you chose if you named this section differently. -
depends_on: ['aws_internet_gateway.internet_gw']We make sure this VM is connected to the internet via our defined internet gateway by making use of the argumentdepends_on -
vpc_security_group_ids:we assign the relevant security group(s) to our VM, this argument takes a list of security groups if we have more than one. In our case we have only one.-
\- '${aws_security_group.security_group.id}'the security group we created earlier mentioned by its ID
-
-
ami: ''the AMI to use for the instance, we left it since we don't want any. -
tags:header for key:value attributes for our VM team-web-server-
Name: 'alpha-webserver-${var.koding_user_username}-${var.koding_group_slug}'we define a key-value pair to identify our VM with a tag on Amazon. We 'named' our VM alpha-webserver-alison40-pied-piper. We made use of the variables "${var.koding_user_username}" which fetches the user name, and the variable "${var.koding_group_slug}" our team name in Koding for Teams.
-
-
-
-
The same goes for our subsequent lines to define the other two VMs "db-master" & "db-slave". Note that we defined our VMs in different subnets and with different name tags
| VM | subnet | name-tag | | --------------- | ------- | ----------------------------------- | | team-web-server | subnet1 | alpha-webserver-alison40-pied-piper | | db-master | subnet2 | db-master-alison40-pied-piper | | db-slave | subnet3 | db-slave-alison40-pied-piper |
Network status:
Full steps visualized
These are the steps we moved through to create our AWS non-default VPC:
Build & Test our stack
Let's now start to build our stack to test our stack template file
Save & test the stack template
Click Save, your stack should build successfully. If there are any errors you will need to attend to them before building your stack.
Build Stack
Click Initialize and close your stack template, follow the step by step modal to build your Stack.

Successful build!
The three VMs are now ready, you and your team can now use your new stack template to build your environments and start Koding!
Further Notes
Congratulations, you have now learned how to build an AWS non-default VPC for your team. You can further experiment and test your stack file. You might want to consider building your VM's ready with the packages required for Each VM. You can make use of the user_data header. i.e. install Apache on webserver and MySQL or Postgres on your DB instances. You can refer to Modifying user_data section in our "Advanced stack editing" guide.
Troubleshooting
- Read carefully the error output when you click Save & Test
- Make sure your stack file indentation is correct
- If your stack file saves correctly but building the stack fails, check the error returned when the build fails. Also make sure the correct ports are open in all your machines. If in doubt, allow all then test again.
- If you are trying an
apt-get installorapt-get updateand it fails, make sure this VM/subnet has access to the internet through an internet gateway! - Review the stack built on AWS if you need to troubleshoot from the "Back-end"
pellegrinotreses37.blogspot.com
Source: https://www.koding.com/docs/create-an-aws-vpc
0 Response to "How to Created Default Vpc Again on Aws"
Post a Comment